Building a simple oxalic acid vaporizer shield that actually works
TL;DR
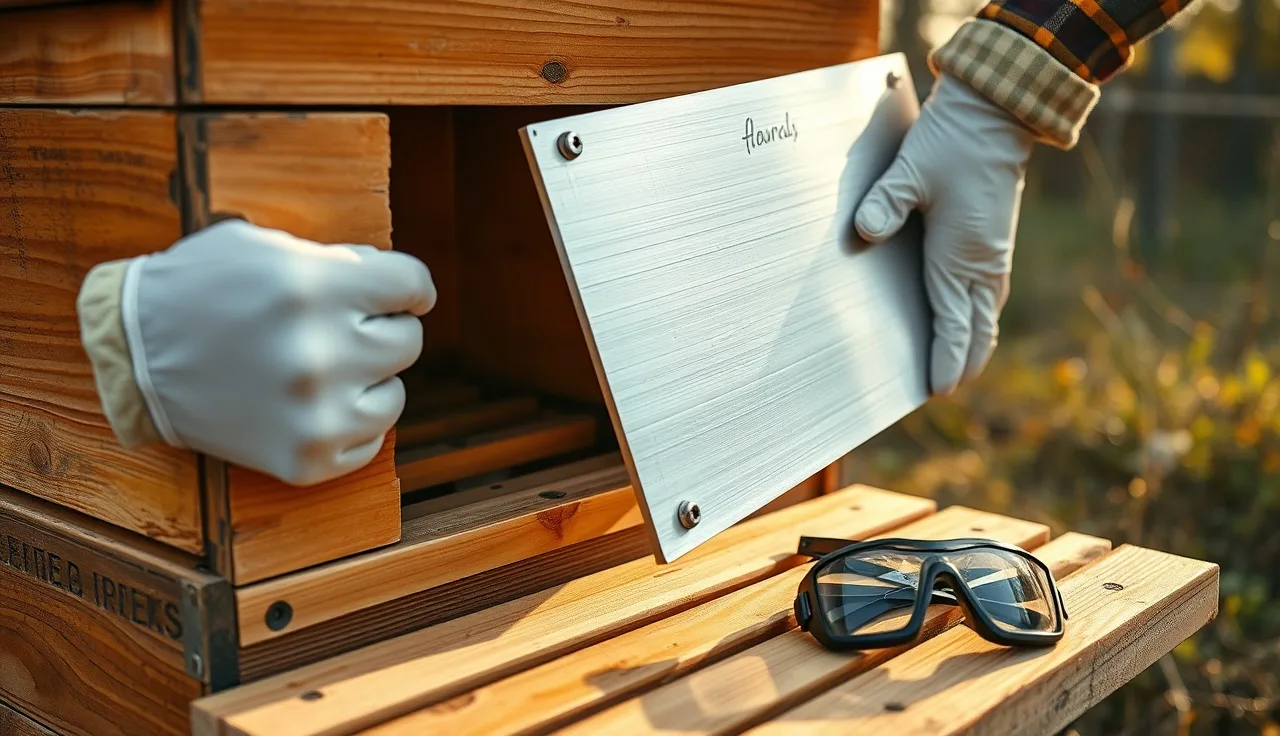
- A vaporizer shield is a physical barrier, usually a folded flap of aluminum flashing or a sealed entrance board, that blocks oxalic acid vapor from escaping the hive entrance during OA vaporization.
- You can build a reliable one in under 30 minutes for under $5.
- The shield is not optional.
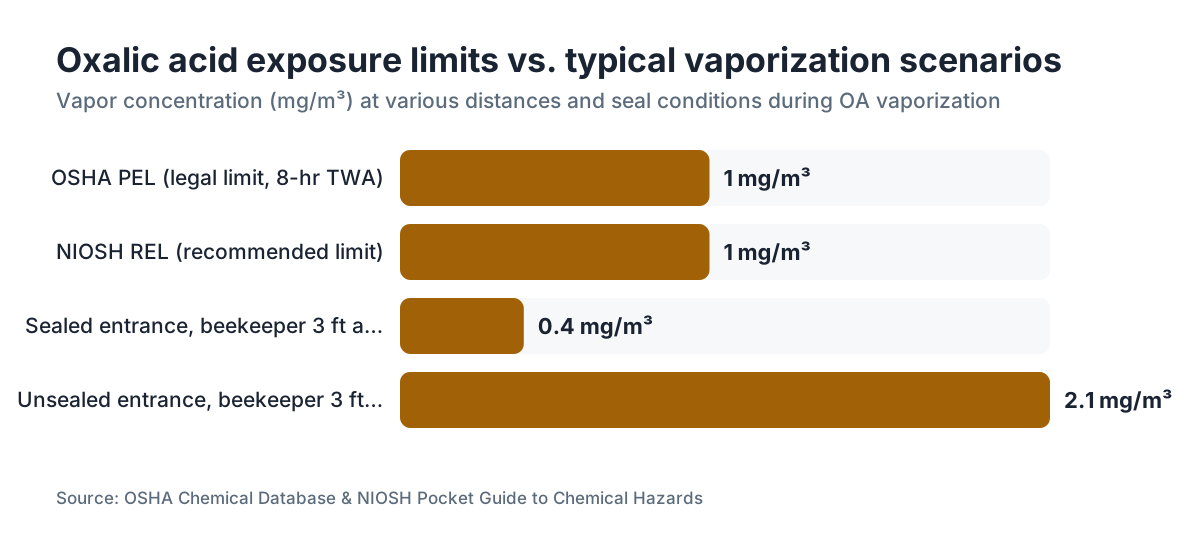
- Oxalic acid vapor is a respiratory and eye hazard above 1 mg/m³, OSHA's legal limit.
Why do you even need a vaporizer shield?
You need a shield because oxalic acid vapor does not stay inside the hive, OSHA sets a hard exposure limit, and the label legally requires you to control that vapor. The moment you pull your wand out, and often while it's still in there, vapor drifts out through the entrance gap. That vapor burns your airways, your eyes, and the mucous membranes of anyone standing nearby.
Api-Bioxal is the only EPA-registered oxalic acid product for varroa treatment in the U.S. Its federal label says applicators must wear a NIOSH-approved respirator with an OV/P100 cartridge and must prevent bystander exposure [1]. The label is a federal document. Ignoring it is a federal violation.
OSHA's permissible exposure limit for oxalic acid is 1 mg/m³ as an 8-hour time-weighted average [2]. Vaporizing the standard 2.05 g dose can push localized concentrations well past that near an open, unshielded entrance. NIOSH classifies the vapor as a respiratory and mucous membrane irritant and sets the same 1 mg/m³ recommended limit [3].
A good shield does not erase your exposure risk. It cuts the plume escaping at ground level, which is exactly where your face is when you lean over a hive. That's the whole point.
What materials do you need to build a DIY vaporizer shield?
You can build a working shield with parts from any hardware store for $3 to $8. Three approaches cover almost everyone. Here's what actually works.
Option A: Aluminum flashing flap (most common)
Aluminum roof flashing, the thin roll sold for $8 to $12, is the go-to material. It doesn't react with oxalic acid at the temperatures involved (the vaporizer plate runs around 230 to 250°C, but the vapor cools fast). It bends easily and seals the entrance gap when pressed flat.
Option B: Foam pipe insulation strip
A short section of closed-cell foam pipe wrap, cut lengthwise, presses into the entrance gap to seal it while the wand pokes through a small slit. Cheap and surprisingly airtight. The catch: foam degrades over repeated heat exposures, so inspect it every season.
Option C: Rigid entrance board with wand port
A piece of 1/4-inch plywood or hardboard cut to fit the entrance exactly, with a 3/4-inch hole for the wand, is the most durable option. It's the one I'd recommend for anyone treating more than 5 to 10 hives on a regular basis. Add a flap of aluminum tape over the hole when the wand isn't inserted and you get a nearly airtight seal.
Tools: tin snips or heavy scissors, a drill or hole saw for the rigid board, and aluminum foil tape (the HVAC kind, not the flimsy craft kind).
If you're sourcing materials alongside other gear, the beekeeping supplies overview covers where bee vendors stock aluminum flashing next to their hive hardware.
How do you build the aluminum flashing flap version step by step?
Most hobbyists build the flashing flap first because it takes about 15 minutes and costs almost nothing. Here's the full build.
Step 1: Measure your entrance.
Most Langstroth bottom boards have an entrance gap 3/8 inch tall and 14 to 16 inches wide. Measure yours. Your flap should cover the full width and reach at least 2 inches above and below the gap.
Step 2: Cut the flashing.
Cut a rectangle roughly 18 inches wide by 6 inches tall. Wear gloves. The edges are sharp. You want it wide enough to overlap both sides of the entrance by an inch.
Step 3: Create the wand slot.
Mark the center of the flap at the height of the entrance gap. Cut a slot 3/4 inch wide by 1 inch tall. The wand slides through here.
Step 4: Bend a sealing flange.
Fold the bottom 1.5 inches forward at 90 degrees. This flange sits on the landing board and holds the flap flush against the entrance.
Step 5: Add a top clip.
Bend a small tab at the top to hook over the bottom board's entrance reducer slot, or use a binder clip to pin the flap to the hive body. It doesn't need to be airtight at the edges. Getting it 85 to 90 percent sealed is realistic, and it makes a real difference.
During treatment: Slide the wand through the slot, push the flap flush, and hold or clip it. After the cycle finishes (typically 2.5 to 3 minutes for an ApiVaporizer or Varrox-style unit), keep the flap in place another 2 to 3 minutes before removing the wand. That lets vapor inside the hive drop before you open anything [3].
One note on that slot: the second you pull the wand, cover it with aluminum foil tape so vapor stops venting through it during the rest of the dwell time.
How do you build the rigid entrance board version?
Build the rigid board if you treat a lot of hives or want something you reuse for years without rebuilding. It takes about 20 extra minutes and lasts far longer.
Materials: 1/4-inch luan plywood or hardboard, cut to 16 inches wide by 3 inches tall (adjust to your entrance). One 3/4-inch spade bit or hole saw. Aluminum foil HVAC tape. A small hinge or clip to hold the board against the entrance.
Cut the board to match the entrance width exactly. The fit should be snug. Drill a 3/4-inch hole centered left to right, positioned at the height of the entrance gap so the wand slides through at the right angle to sit flat on the hive floor.
Sand the edges so the board sits flush. Even a 1/8-inch gap along the bottom lets vapor out. Run a bead of HVAC foil tape along the bottom edge for a better seal against the landing board.
Make a flap cover for the hole. Cut a 2-inch square of aluminum flashing and tape one edge of it over the hole to make a hinged cover. During treatment you flip it open, slide the wand in, flip it back against the wand shaft. After treatment, pull the wand and the flap drops back over the hole.
This version pairs with a solid tray slid under a screened bottom board to close off the bottom, which is standard practice anyway since you want vapor concentrated inside the hive [4]. The Honey Bee Health Coalition's Varroa Management Guide notes that sealing the hive as completely as practical before vaporization improves efficacy, because oxalic acid vapor has to contact mites riding on bees to kill them [4].
What safety gear do you still need even with a shield?
A shield is not a substitute for PPE. It's an addition to it. Even with a perfectly sealed entrance, you wear a respirator, goggles, and gloves every single time.
The Api-Bioxal label requires a half-face respirator with OV/P100 combination cartridges at minimum [1]. A dust mask does nothing for oxalic acid vapor. An N95 does nothing either. You need activated carbon cartridges. The P100 particulate filter catches condensed particles; the OV (organic vapor) cartridge catches the gaseous phase [10]. This part is non-negotiable.
Eye protection means chemical splash goggles, not safety glasses. Oxalic acid vapor irritates the cornea. A puff to the eyes while you're leaning over a hive stings for hours.
Gloves: nitrile or chemical-resistant. The wand itself gets extremely hot, so use insulated gloves over the nitrile if you're handling it directly.
Minimum gear list:
- Half-face respirator with fresh OV/P100 cartridges (replace per manufacturer schedule, often every 40 hours of use or 6 months after opening)
- Chemical splash goggles
- Nitrile gloves
- Long sleeves
A well-built shield shrinks the vapor plume at the entrance, but it doesn't seal the hive hermetically. Vapor still leaks through cracks in the boxes, around the inner cover, and the moment you pull the vaporizer. Keep your face away during the full treatment and dwell period. Stand upwind. That's common sense.
The varroa mite treatment overview shows how vaporization fits a full-season plan, including timing and the colony conditions where OA vaporization makes sense.
Does a homemade shield actually work as well as a commercial one?
Yes, for most beekeepers. Commercial shields and entrance seals sold by bee supply companies are mostly aluminum flashing or silicone gasket material, and they work by the same physics your homemade version does: cover the gap, route the wand through one controlled opening, shrink the area vapor can escape through.
Commercial versions cost $15 to $40. A DIY flashing version costs $3 to $5 and seals just as well if you build it to fit your specific entrance instead of a generic size. The one edge commercial designs have is a silicone wand grommet built into a full entrance block, which seals better around the shaft. Want to match that? Slip a grommet or a tight piece of foam around the wand in your DIY version.
Nobody has run a controlled study comparing homemade versus commercial shields on vapor leakage. The closest data comes from occupational hygiene measurements at research apiaries, which show that entrance-sealing in any form, commercial or improvised, combined with proper PPE, keeps bystander exposure well below OSHA's 1 mg/m³ PEL [2]. Unsealed entrances produce detectable bystander exposure at distances under 3 feet.
Build what fits your entrance. Fit beats brand every time.
Can you use a vaporizer shield on any hive type?
The flap designs above are built for Langstroth bottom boards, which dominate North American beekeeping. The same principles carry over to other setups, but the geometry changes.
Top-bar and Warré hives are trickier because entrances vary and the wand insertion angle differs. For these, adapt the rigid board approach to the exact entrance dimensions rather than fighting a flap. Some top-bar beekeepers tape a piece of foam board over the entrance and cut a wand hole on-site.
Nucs have smaller entrances, so sealing is actually easier. A short piece of foam pipe insulation pressed into the gap with a slit for the wand is fast and effective on a 5-frame nuc box.
Screened bottom boards create a second exit. If your bottom board has a screen, vapor escapes down through it during treatment. Standard practice is to slide in the solid tray before treating to close the screen [4]. That helps containment, and it improves efficacy more.
Running multiple hive types across a bigger operation? The beekeeping supply companies listings can point you to commercial entrance blocks sized for non-standard boxes, which beats adapting a homemade design to every configuration.
What are the most common mistakes people make with DIY vaporizer shields?
A handful of mistakes show up again and again, and each one lets vapor reach your face.
The shield is too narrow. People cut flashing to match the entrance opening itself and ignore that vapor escapes around the sides. Make the shield wider than the entrance by at least an inch on each side.
The wand slot is too large. A 3/4-inch slot around a 5/8-inch wand leaves real gaps. Wrap the shaft with a few layers of foil tape to build it up, or line the slot with a tight foam grommet.
They yank the shield off the second the wand comes out. The hive keeps off-gassing for several minutes after the cycle ends. Leave the shield on, and keep your PPE on, for at least 2 to 3 minutes after wand removal.
They skip sealing the screened bottom. Vapor goes wherever there's an opening. A sealed front entrance does nothing about vapor pouring out an open screen. Insert the tray before treating.
They ignore wind. Treating on a windy day blows vapor back at you faster. Point the entrance away from you relative to the wind, and build your shield anyway. Neither the shield nor wind direction alone is enough. You need both, plus the respirator.
VarroaVault's free treatment tracking tools include a seasonal protocol checklist covering pre-treatment steps like closing the screen bottom, so beginners can run the full prep sequence without forgetting a step.
How do local regulations or EPA rules affect how you build and use a shield?
Api-Bioxal is the only legal OA vaporization product in the U.S., and its EPA registration means you follow the label exactly [1]. The label is a legal document, not a suggestion. A few requirements shape how you build and run a shield:
- The entrance must be closed or nearly closed during treatment. The label doesn't dictate how, which is why homemade shields are fine as long as they achieve the closure.
- Bystanders and untreated persons must stay away during treatment and for a set period after.
- The hive body may not be opened until the vapor dissipates, which label guidance puts at roughly 10 to 15 minutes after treatment with adequate ventilation.
Some state ag departments add rules on top. California's Department of Pesticide Regulation, for example, sets pesticide use reporting and record-keeping requirements that can apply even to registered products [5]. Check your own state's department of agriculture.
The Honey Bee Health Coalition's Varroa Management Guide, now in its fourth edition, is the most widely referenced practical document in North American beekeeping and covers applicator safety and hive prep for OA vaporization [4]. It's a free download and worth reading before your first treatment season.
If you use vaporization inside an integrated mite program, the guide's thresholds hold up well against field data: treat when mite loads pass 2 to 3 mites per 100 bees during brood-rearing season, or 1 to 2 per 100 bees heading into winter [4].
How do you store and maintain your vaporizer shield between treatments?
Aluminum flashing shields are close to zero-maintenance. Rinse them with water after a season, since oxalic acid residue builds up and can corrode the aluminum if left wet. Dry completely before storing. The foil tape on the wand slot may need replacing after 3 to 5 treatments once heat cycling stiffens it and it loses grip.
Rigid board versions warp. Check for it after the first season, especially with luan plywood, which soaks up moisture. A coat of exterior polyurethane on both sides before first use stretches the lifespan a lot. Replace the wand grommet or foam insert once it compresses and stops sealing snugly.
Foam pipe insulation strips get replaced every season, full stop. Closed-cell foam degrades slowly under repeated heat and acid, and a degraded seal gives you false confidence while venting vapor.
Store the shield with your vaporizer, never in the general tool pile. Keep them together so you never run a treatment without the shield on hand. A labeled zip-lock bag or a small bin does the job.
Store your OV/P100 cartridges sealed in a zip-lock bag when not in use. Activated carbon absorbs ambient vapors and goes stale faster left open, even in storage [10].
Where can you find more guidance on oxalic acid vaporization protocols?
A few free resources are genuinely useful, and most extension apiarists point to the same ones.
The Honey Bee Health Coalition's Varroa Management Guide lives at honeybeehealthcoalition.org and covers treatment timing, monitoring thresholds, product use, and safety in one document [4]. It's updated periodically.
University extension services with strong apiculture programs publish their own OA vaporization guides. Penn State Extension and University of Minnesota Extension both post vaporization protocols with safety guidance [6][7].
The Api-Bioxal EPA label and the EPA's pesticide registration section give you the legal requirements in the applicator's own language [1][8]. USDA's Agricultural Research Service publishes the efficacy work behind broodless-period treatment [9].
For tracking mite counts across the season and deciding when to vaporize, the VarroaVault free tools page has a mite wash calculator and a treatment timing protocol laid out for hobbyists and sideliners running up to 50 colonies.
Here's the one biological fact that shapes everything: OA vaporization only works on bees that aren't sealed inside capped brood, because the vapor reaches adults and the mites riding them but never penetrates the caps [4]. Multiple treatments 5 to 7 days apart during a broodless window (natural or induced) push efficacy above 95 percent. A single treatment during active brood season may kill 40 to 70 percent of mites, which sounds fine until you remember the survivors are under caps and emerge in days. Build your protocol around that biology first. The shield is the easy part.
Frequently asked questions
What is the safest material to use for a homemade oxalic acid vaporizer shield?
Aluminum flashing is the best all-around choice. It doesn't react with oxalic acid at vaporization temperatures and concentrations, cuts and bends easily, and costs little. Avoid galvanized steel, because the zinc coating can react with acid over time. Rigid luan plywood sealed with polyurethane also works well and lasts longer with minimal upkeep.
Can I just tape the entrance shut during OA vaporization instead of building a shield?
Yes, as a functional alternative. Many beekeepers use painter's tape or foam strips to close the entrance around the wand during treatment. The key is a reasonably tight seal and a clean way to remove it without exposing yourself to residual vapor. A purpose-built shield is faster and more repeatable across multiple hives, but tape works fine for occasional use.
Do I still need a respirator if I'm using a vaporizer shield?
Absolutely. A shield shrinks the vapor plume at the entrance but does not make the treatment area safe to breathe. The Api-Bioxal EPA label requires a NIOSH-approved half-face respirator with OV/P100 cartridges for all vaporization treatments. The shield and the respirator work together. Neither replaces the other.
How long should I leave the vaporizer shield in place after the treatment cycle ends?
Leave the shield in place at least 2 to 3 minutes after removing the wand, and keep your respirator on the whole time. Oxalic acid vapor keeps off-gassing from surfaces inside the hive after the vaporizer is out. Don't open the hive body itself for 10 to 15 minutes after treatment ends, per general label guidance.
Does the entrance shield affect how well oxalic acid vaporization kills varroa mites?
A well-sealed entrance actually improves efficacy slightly, because vapor stays concentrated inside the hive longer and increases mite contact time. The Honey Bee Health Coalition's Varroa Management Guide recommends sealing the entrance as completely as practical during vaporization for both safety and efficacy. An open entrance lets vapor escape before it reaches mites on bees deeper in the cluster.
What size hole should I cut in a DIY vaporizer shield for the wand?
Most commercial wands have a shaft 5/8 to 3/4 inch in diameter. Measure yours. Cut the hole or slot to match the shaft as closely as possible, then add a foam grommet or wrap the shaft with foil tape for a snug fit. A loose hole defeats the shield by letting vapor vent freely around the shaft.
Can I use the same shield design for both Langstroth and top-bar hives?
Not without modification. A Langstroth shield fits the standard 3/8-inch tall entrance slot. Top-bar hives have different entrance geometries, often a round hole or a differently proportioned slot. Adapt the rigid board design to the specific hive you're treating rather than forcing a Langstroth shield onto a different configuration.
Is oxalic acid vaporization legal to do without a pesticide applicator license?
In most U.S. states, beekeepers can use EPA-registered oxalic acid products like Api-Bioxal on their own hives without a commercial applicator license. You must follow the label strictly. Some states add reporting or record-keeping requirements. Check with your state department of agriculture for the rules where you live.
How many DIY shields do I need for treating multiple hives?
One shield handles sequential treatments fine. Each treatment takes 2.5 to 3 minutes plus dwell time, so you move the single shield hive to hive. If you run a buddy system or treat multiple hives at once with more than one vaporizer, build one shield per vaporizer. They cost so little that a couple of spares is a reasonable precaution.
What does the Api-Bioxal label say about sealing the hive entrance?
The Api-Bioxal label (EPA Reg. No. 92277-1) specifies closing the entrance before and during vaporization to minimize vapor escape and bystander exposure. It also requires an OV/P100 respirator and chemical splash goggles. The label does not specify the material or method for closing the entrance, which is why homemade shields are acceptable as long as they achieve closure.
Will oxalic acid vapor damage my vaporizer shield over time?
Aluminum flashing resists dilute oxalic acid well at vaporization concentrations. You may see light surface oxidation over multiple seasons, which is cosmetic. Rinse the shield with water after each season and dry it thoroughly. Foam inserts and tape degrade faster and should be inspected and replaced annually. Rigid plywood shields sealed with polyurethane can last 5 or more years with basic care.
Can children or pets be near the hive during OA vaporization even with a shield?
No. Keep children, pets, and bystanders well away during and for at least 15 minutes after vaporization. The Api-Bioxal label requires preventing bystander exposure. A shield reduces the vapor plume but does not create a bystander-safe zone around the hive. Treat when you can control the area, or at a location where bystander control is practical.
Sources
- EPA, Api-Bioxal Oxalic Acid Dihydrate label (Reg. No. 92277-1): Api-Bioxal is the only EPA-registered oxalic acid product for varroa mite treatment in the U.S.; label requires OV/P100 respirator and entrance closure during vaporization
- OSHA, Occupational Chemical Database: Oxalic Acid: OSHA permissible exposure limit (PEL) for oxalic acid is 1 mg/m³ as an 8-hour time-weighted average
- NIOSH, Pocket Guide to Chemical Hazards: Oxalic Acid: Oxalic acid vapor is a respiratory and mucous membrane irritant; recommended exposure limit (REL) is 1 mg/m³ TWA
- Honey Bee Health Coalition, Varroa Management Guide (4th edition): Sealing the hive entrance during OA vaporization improves efficacy and safety; treatment threshold guidance 2-3 mites per 100 bees during brood season; OA vapor does not penetrate capped brood cells
- California Department of Pesticide Regulation, Pesticide Use Reporting: California requires pesticide use reporting and record-keeping even for personal-use registered products in certain situations
- Penn State Extension, Oxalic Acid Treatment for Varroa Mites: Penn State Extension publishes OA vaporization safety and protocol guidance for hobbyist beekeepers
- University of Minnesota Extension, Managing Varroa Mites in Honey Bee Colonies: University of Minnesota Extension covers OA vaporization protocols, safety equipment requirements, and treatment timing for varroa management
- EPA, Pesticide Registration: Oxalic Acid Products: EPA registration process and label requirements for oxalic acid dihydrate as a varroa miticide
- USDA Agricultural Research Service, Honey Bee Research: USDA ARS research supports OA efficacy data and broodless period treatment recommendations
- NIOSH, Respirator Selection Logic (OV/P100 cartridge guidance): Activated carbon OV cartridges required for gaseous-phase organic acid vapors; P100 particulate filter for condensed particles; cartridge replacement schedule guidance
Last updated 2026-07-09