Alcohol wash jar lid modification for easy mite counting
TL;DR
- Cut a screen window into a standard mason jar lid and you can pour off the alcohol after a wash without losing mites.
- Counting gets faster and more accurate.
- The mod costs under $2 in hardware-store mesh, takes about five minutes with a utility knife, and works with any wide-mouth quart jar.
- Most beekeepers who try it never touch cheesecloth again.
What is the alcohol wash jar lid modification and why does it matter?
The alcohol wash is the most accurate field method beekeepers have for measuring varroa loads. The Honey Bee Health Coalition's Varroa mite management guide treats the alcohol wash as a reliable standard for estimating infestation levels, and it's the method most university extension programs teach [1]. The standard protocol has one annoying flaw. Once you shake the jar and the mites drop off the bees, you have to pour the alcohol somewhere so you can count the mites on a white surface. Most beginners slop the liquid through a coffee filter or a piece of cheesecloth stretched over a bowl, and mites go everywhere.
The lid modification fixes that. You cut or punch a screen window into a standard mason jar lid insert, and the jar becomes a two-chamber system. Shake in the alcohol, cap it, swirl it, then flip the jar and let the alcohol drain through the screen into a catch container (or toward the ground). The mites stay on the screen, visible and countable. No filter to wrestle with. No mites washed away. No scrambling for a white plate in the field.
For anyone running more than two or three hives, the time savings alone earn this mod its place. For someone new to monitoring, it removes the fumbling that causes counting errors and makes people skip the wash entirely. Accurate mite counts are the foundation of every treatment decision. A bad count from a leaky improvised filter is worse than no count, because it hands you false confidence.
For the biology driving all this, our varroa mite article covers how mite populations build through the season and why the timing of your washes matters as much as the method.
What materials do you need to build the modified lid?
The list is short and cheap. You need a wide-mouth mason jar (quart size is easiest to work with), a replacement wide-mouth lid insert (the flat disc, not the ring), and a piece of hardware cloth or mesh screen. Most beekeepers use aluminum window screen or a finer nylon mesh in the 200 to 300 micron range. Here's the measurement that decides everything: varroa mites are roughly 1.0 to 1.8 mm long [2], so your mesh needs gaps smaller than about 1 mm to hold them. Standard #8 hardware cloth has openings of about 3.2 mm, which is far too coarse. Aim for something like window screen (around 1.0 to 1.2 mm openings) or finer.
Here's how the common mesh options stack up:
| Mesh option | Approx. opening size | Retains mites? | Drains fast? | Approx. cost (small sheet) |
|---|---|---|---|---|
| #8 hardware cloth | 3.2 mm | No, too coarse | Yes | ~$1 |
| #16 hardware cloth | 1.6 mm | Marginal | Yes | ~$1 |
| Aluminum window screen | 1.0-1.2 mm | Yes | Yes | ~$0.50 |
| 300-micron nylon mesh | 0.3 mm | Yes, very reliable | Slightly slow | ~$1-2 |
| Fine stainless strainer mesh | 0.5-1.0 mm | Yes | Yes | ~$2-4 |
Aluminum window screen from a hardware store is the most common pick. It's cheap, cuts with scissors, doesn't corrode, and the openings are small enough to catch mites. Skip galvanized steel if you're worried about corrosion from repeated alcohol exposure.
Beyond the mesh, you need something to cut the lid insert (a utility knife or tin snips), something to hold the mesh (waterproof silicone sealant, E6000 adhesive, or just the jar ring used as a clamp), and about ten minutes. Plenty of beekeepers skip adhesive entirely and let the jar ring clamp the mesh over the cut lid. That works fine as long as the mesh overlaps the lid edge generously.
How do you actually cut and assemble the modified lid?
Step one: draw a circle on the lid insert, leaving about 8 to 10 mm of metal rim all the way around. A coin or bottle cap makes a good sizing template. Keep enough metal rim that the lid still seats in the jar ring and seals when the jar is upright.
Step two: cut out the center. A utility knife with a fresh blade works on the thin metal of standard lid inserts if you score and re-score the circle several times. Tin snips are faster and cleaner. After cutting, file or sand the sharp burrs on the inside edge so the mesh doesn't wear through early.
Step three: cut your mesh to size. Make it a circle about 15 to 20 mm larger in diameter than your cutout, so it overlaps the metal rim on all sides.
Step four: attach the mesh. If you're using adhesive, run a bead of waterproof silicone or E6000 around the rim on one side, press the mesh down, and let it cure for 24 hours before any alcohol touches it. If you're using the ring-clamp method, lay the mesh over the lid insert and screw the jar ring down over the whole stack. The ring holds the mesh flat and tight. This is the faster method, and it's the one most beekeepers land on after trying both.
Step five: test it before you head to the apiary. Pour plain water into the closed jar and shake it. Flip the jar. Water should flow through freely with no leaks around the mesh edge. If water sneaks around the sides instead of through the mesh, your cutout is too large or your mesh overlap is too small.
One practical note. Make two or three of these at a time. They cost almost nothing, and having a spare when one gets bent or lost mid-visit is genuinely useful. If you're sourcing supplies, many beekeeping supply companies sell pre-screened lids if you'd rather skip the cutting.
How do you use the modified jar to perform an alcohol wash?
The protocol itself hasn't changed. Only the equipment gets cleaner. The standard alcohol wash, as described by the Honey Bee Health Coalition and Oregon State University Extension, goes like this [1][3]:
- Find a frame with capped brood and open cells full of bees, ideally away from the queen.
- Shake or brush roughly 300 adult bees into the jar (about half a cup by volume).
- Add at least 1 to 2 cups of 70% isopropyl alcohol, enough to submerge the bees.
- Cap the jar with your modified lid and ring, then shake hard for 60 seconds.
- Flip the jar over a catch container or off to the side and let the alcohol drain through the screen.
- Count the mites on the mesh.
With the standard pour-through approach, step 5 is where it all goes wrong. With the screen lid, you hold the jar inverted and the liquid pours out in 10 to 15 seconds. The mites sit on the mesh, visible and still.
A white sheet of paper or a white plastic lid held under the jar as you flip it makes mites easier to spot when your mesh is dark. Some beekeepers add a second rinse: pour another half-cup of fresh alcohol through the screen while the jar is inverted to knock loose any mites stuck to the jar walls. That second rinse usually recovers a few more mites and tightens up your count.
Divide the mite count by the number of bees sampled (about 300) and multiply by 100 for the infestation rate as a percentage. The action threshold cited by the Honey Bee Health Coalition is around 2% during the honey production season and 2 to 3% in late summer or fall [1][4]. At or above those numbers, treat.
Is the alcohol wash actually accurate enough to matter?
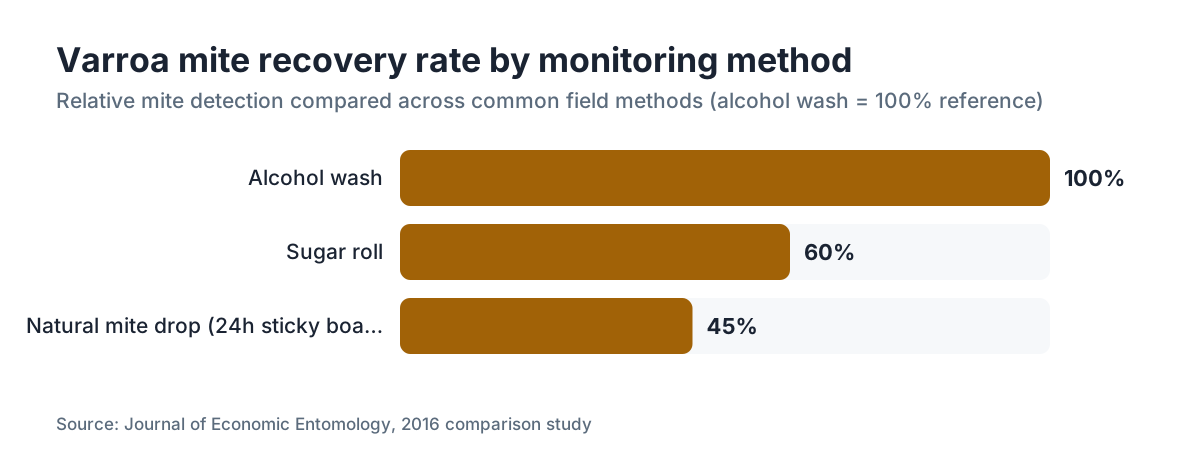
Yes, and it beats the alternatives for most beekeepers. A 2016 comparison in the Journal of Economic Entomology found the alcohol wash detected varroa at significantly higher rates than the sugar roll when both ran on the same colonies [5]. The sugar roll is gentler on bees but consistently undercounts, because not every mite lets go in a dry medium.
The sticky board (natural mite drop) gives you a trend rather than a direct count and takes 24 to 72 hours to run. Useful for watching things between washes. Not useful for a clean infestation percentage without messy math and assumptions about colony size.
The alcohol wash isn't perfect. It samples adult bees only, so it misses the roughly 30 to 70% of mites tucked inside capped brood cells at any moment [6]. That's a limit of the method, not a flaw in your jar lid. What you're measuring is the phoretic (bee-attached) mite load, which tracks total colony burden well and, more to the point, is repeatable. Repeatability matters more for decisions than one theoretically complete count.
On the mod itself: a well-made screen lid pulls more mites off than the cheesecloth-over-a-bowl routine. Nothing folds, nothing splashes over the edge, nothing hides in cloth fibers. Counting mites on a flat mesh surface is simply more reliable than digging them out of a filter's creases.
What kind of alcohol should you use and does it need to be exact?
Standard 70% isopropyl alcohol (rubbing alcohol) is what almost every protocol specifies, and it's what you should use. It's cheap, sold at any pharmacy or dollar store, and it detaches mites within 60 seconds of hard shaking [1][3].
Higher concentrations (91% or 99% isopropyl) work too and may knock mites loose a touch faster, but they cost more and give you no real accuracy edge for this test. Ethanol (grain alcohol or denatured alcohol) works as well, though it's harder to source at the right strength, and denatured alcohol carries additives that are unpleasant to handle in the field.
Don't use hand sanitizer. The gel won't circulate around the bees, and mite knockdown comes out inconsistent.
One safety point, stated plainly: isopropyl alcohol is flammable. Don't run the wash near open flames, lit smokers, or in a closed space with poor ventilation. Keep the jar capped when you're not using it. A quart jar of alcohol tipped over by a lit smoker is a real hazard, not a hypothetical one.
The bees die in the process, which is why you sample away from the queen. Around 300 bees out of a healthy colony of 30,000 to 60,000 is a trivial loss (well under 1%), and the data you get back is worth it.
Can you reuse the modified lid and how do you clean it?
Yes, and reusability is one of the big reasons this mod beats disposable plates or filters. After each use, rinse the jar and lid with fresh isopropyl alcohol or warm soapy water. The alcohol cuts the bee residue fast. Let it air dry all the way before storing, especially if your mesh is siliconed on, so no moisture gets trapped at the bond.
Aluminum window screen handles hundreds of uses without any degradation. Nylon mesh holds up well too, though it may yellow a bit over time from alcohol exposure. That doesn't touch performance. If you used E6000 or silicone, check the bond now and then. After a season or two of heavy use, the adhesive can start to lift at the edges. A fresh bead of silicone reseals it in a few minutes.
Steel or galvanized mesh rusts eventually, which is why most beekeepers stick with aluminum or nylon. Rust won't hurt a single season, but by year two you'll see discoloration and then pinholes that can let mites slip through.
Store the assembled jar with the modified lid on and the ring loose, so the jar isn't fully sealed and moisture can escape. Some beekeepers keep one jar pre-loaded with alcohol inside a sealed zip-lock bag for field use. That works fine as long as the bag itself holds against alcohol vapor.
Are there commercial alternatives to the DIY lid mod?
A few purpose-built varroa counting jars exist. The VETO-PHARMA Varroa EasyCheck is probably the most widely used commercial option. It's a two-chamber plastic device with a built-in mesh that works on the same principle as the lid mod, and it runs roughly $15 to $20 depending on the retailer [7]. It works well and it's sturdier than most homemade versions.
Whether that beats a $0.50 lid mod is a personal call. If you're monitoring 20 hives and running two washes per hive a season, the durability and consistent mesh size might earn their keep. For someone with four hives who checks three or four times a year, a homemade screen lid does the same job.
Some beekeeping supplies retailers sell pre-modified mason jar lids with screen inserts, usually $3 to $8 per lid. That's a fair middle ground if you want the mason jar setup without cutting anything.
VarroaVault's free tools section covers monitoring equipment comparisons, including notes on when commercial devices earn their cost and when they don't.
For most hobbyists, the honest answer is simple. Build the lid mod first. Use it for a season. If you find yourself wanting something sturdier or more precise, then buy a commercial device. Don't buy gear you don't yet know you need. A quick check of free shipping honey bee supply companies helps you compare prices if you decide to buy rather than build.
How does this modification fit into a full seasonal monitoring protocol?
The mod is a tool. The protocol around it is what actually protects your colonies. The Honey Bee Health Coalition recommends monitoring at least once a month during the active season, plus one check in late summer or early fall to catch the mite peak before winter bees are made [1]. That late summer check, typically late July through August across the northern United States, is the single most important wash of the year.
A sensible schedule for a hobbyist in a temperate climate might read:
- Early May: baseline wash as the colony builds
- Late June: mid-season check
- Late July to mid-August: the make-or-break pre-treatment window
- September to October: post-treatment check to confirm the treatment worked
Each wash takes about 10 minutes with a well-made modified jar. Four washes per colony per year comes out to roughly 40 minutes of monitoring time per colony to make sound treatment decisions for the whole season. That's a very good return.
If counts hit or pass the 2% threshold during honey production, or 2 to 3% in late summer [1][4], treat. Your options include oxalic acid (vapor or dribble), amitraz-based strips, and thymol-based products, all with EPA-registered labels that spell out application windows and temperatures [8]. The right choice depends on timing, brood status, and local temperature. None of that decision-making holds up if your mite counts are wrong, which is exactly why getting the wash right, lid and all, matters.
What are the most common mistakes people make when doing the wash?
Not sampling enough bees is the biggest one. Shake in 100 bees instead of 300 and your count loses statistical reliability. A single mite in a 100-bee sample reads as 1%; in a 300-bee sample you'd need 3 mites to hit that same 1%. Oregon State University Extension recommends 300 bees per sample for exactly this reason [3].
Using mesh that's too coarse is the second most common problem with the DIY lid. Build yours with hardware cloth larger than about 1.5 mm and some mites pour out with the alcohol. You'll undercount, feel reassured, and maybe skip a treatment you actually needed. Measure the mesh before you commit to cutting the lid.
Not shaking long enough is a real issue. Sixty seconds of hard shaking is the standard. Plenty of people shake for 20 or 30 seconds and call it done. Mites wedged between abdominal segments need real agitation to break loose, especially in cool weather. If you're working in fall with temperatures below 60 F, shake longer.
Counting in bad light is an easy miss. Mites are about 1 mm and dark reddish-brown. On dark mesh in the shade, they vanish. Count in direct sunlight or with a headlamp aimed at the screen. A 10x hand lens helps if your eyesight isn't sharp.
And some beekeepers sample the wrong bees. Nurse bees around capped brood carry more phoretic mites than foragers on outer frames [6]. The wash gives a more informative reading when you pull your sample from the brood nest instead of the entrance or the honey frames.
Is there a way to count mites without killing bees?
The sugar roll is the main bee-safe alternative. You coat the bees in powdered sugar, shake them in a mesh container, and count the mites that drop out. The bees go back in the hive. But several studies, including the 2016 Journal of Economic Entomology comparison, found the sugar roll recovers fewer mites than the alcohol wash on the same samples [5]. Undercounting means potentially missing a treatment threshold, and that's a real cost to colony health.
The natural mite drop (a sticky board under the hive for 24 to 72 hours) is also non-lethal and gives you a daily drop count. Converting that number into an infestation percentage takes assumptions about colony size that are hard to verify in the field. Good for trends. Weak for a single decisive call.
Some research has looked at CO2-based washes, where bees are briefly knocked out rather than killed, but as of 2025 that isn't a validated field protocol with published thresholds. It's ongoing work.
For most beekeepers, the trade-off is honest and blunt. The sugar roll spares 300 bees per test but hands you softer data. The alcohol wash sacrifices those 300 bees and gives you a number you can act on. A missed threshold from an undercount can kill a colony of 50,000 bees, so the math strongly favors the alcohol wash for decision-making washes. Use the sugar roll for casual between-wash checks if you want a gentler method.
Frequently asked questions
What size mesh should I use in the mason jar lid for the alcohol wash?
Use mesh with openings smaller than about 1.5 mm. Aluminum window screen (openings around 1.0 to 1.2 mm) is the most practical and widely available choice. Avoid #8 hardware cloth, which has 3.2 mm openings that let mites through. Nylon mesh in the 200 to 300 micron range works well too, though it drains a little slower. The goal is holding mites that are roughly 1.0 to 1.8 mm long while letting alcohol pour out freely.
Do I need to use a quart-size jar or will a pint work?
A quart jar (32 oz) is easiest because it gives you room to swirl a full alcohol wash plus 300 bees without spilling. A wide-mouth pint works if you watch the fill level, but it's cramped and harder to shake hard without the lid loosening. If you already own pint jars, try one, but most beekeepers settle on the quart after a wash or two.
How do I keep the mesh in place without glue?
Cut your mesh circle about 15 to 20 mm larger in diameter than the hole in the lid insert. Lay the mesh over the cut insert so it overlaps all around the rim. Then screw the jar ring down over the whole assembly. The ring clamps the mesh flat against the jar rim and holds it through normal use. No adhesive needed. This ring-clamp method is also easier to take apart for cleaning or mesh swaps.
How many bees should I collect for an accurate alcohol wash?
The standard is about 300 adult bees, roughly half a cup by volume. Oregon State University Extension specifies 300 bees as the recommended sample size for reliable mite percentage calculations. Samples under 200 bees carry higher statistical error. Shake bees off a brood-nest frame (away from the queen) straight into the jar for the most informative reading.
Can I reuse the alcohol from the wash?
Not for another wash. Used wash alcohol carries wax, pollen, propolis, and bee body fluids, all of which cut its ability to dislodge mites in the next test. Dispose of it properly (check your local hazardous waste guidelines; most municipalities allow small quantities down the drain with plenty of water). Fresh alcohol per wash is cheap enough that reuse isn't worth the accuracy hit.
What is the varroa treatment threshold and when should I treat?
The most commonly cited threshold is 2% (2 mites per 100 bees) during the honey production season, and 2 to 3% in late summer before winter bee production. The Honey Bee Health Coalition's Varroa mite management guide uses these figures as general action thresholds. Some researchers and extension programs use slightly different numbers, but 2% is a defensible trigger for most temperate North American climates. Check your specific state extension guidance.
How is the alcohol wash lid mod different from just using cheesecloth?
Cheesecloth has inconsistent opening sizes, folds and traps mites in the fabric, and is hard to hold over a bowl while pouring without spilling. The screen lid is rigid, sits flat, holds mites in a single visible layer, and lets you invert the jar cleanly. In practice the screen lid recovers more mites because nothing sticks in fabric folds. It also frees both hands, which matters when you're working alone at an apiary.
Is the alcohol wash the gold standard for varroa monitoring?
It's widely considered the most accurate field method for measuring phoretic (adult bee-attached) mite loads. The 2016 Journal of Economic Entomology comparison found the alcohol wash detected higher mite rates than the sugar roll on the same colonies. It doesn't capture mites inside capped brood cells, which can be 30 to 70% of the total mite population, but the phoretic count tracks overall colony burden well and is reproducible enough to support treatment decisions.
How do I count the mites on the screen after the wash?
Hold the inverted jar in direct sunlight or under a headlamp with the screen facing you. Mites show up as small dark reddish-brown oval specks, roughly 1 mm across. A 10x hand lens helps a lot if you're unsure what you're seeing. Count every mite on the screen, then divide by the number of bees in your sample (usually 300) and multiply by 100 for the infestation percentage. A white surface behind the jar improves contrast if your mesh is dark.
Does the modification affect the accuracy of the wash compared to a standard jar?
Done right, it improves accuracy slightly, because you recover more of the mites that a pour-through-cheesecloth step would lose. The only real risk is using mesh that's too coarse (mites pass through) or mesh with inconsistent hole sizes. Built properly with window screen or fine nylon mesh, the modified lid produces results at least as accurate as any other vessel-based method, and more repeatable than improvised filters.
Can I use this jar setup for a sugar roll instead of an alcohol wash?
Technically yes, but the mesh that works for the alcohol wash (around 1 mm openings) sits close to the opening size a sugar roll needs. Some beekeepers use the same jar with powdered sugar and shake the bees over a white surface. The catch is that the sugar roll already recovers mites at a low rate, and any mesh that retains mites too well cuts recovery further. For sugar rolls, a purpose-built container with slightly larger mesh is more common.
How long does it take to build a modified alcohol wash lid?
About 5 to 10 minutes once you have materials on hand. Cutting the lid insert takes 2 to 3 minutes. Cutting the mesh takes another minute. With the ring-clamp method and no adhesive, assembly is immediate. With silicone sealant, add 24 hours of cure time before the first wash. Making three lids at once instead of one barely adds time and gives you backups.
Where can I find the materials to make a modified alcohol wash lid?
Any hardware store carries wide-mouth mason jar lid inserts, aluminum window screen, and a utility knife. Total material cost runs under $2 per lid. Replacement mason jar lid inserts usually sell in boxes of 12 for $3 to $5. Window screen sells by the linear foot or in small rolls. You may already have everything in a basic toolbox. No specialty beekeeping supplies are required, though some beekeeping supply retailers also sell pre-screened lids.
Sources
- Honey Bee Health Coalition, Varroa Mite Management Guide (2023 edition): The alcohol wash is a reliable standard for estimating varroa infestation levels; action threshold is approximately 2% during honey production and 2-3% in late summer.
- USDA Agricultural Research Service, Bee Research Laboratory (Varroa destructor biology): Varroa destructor mites are approximately 1.0 to 1.8 mm in length.
- Oregon State University Extension, Sampling Bees for Varroa Mites: Oregon State University recommends sampling approximately 300 bees for reliable mite percentage calculations in the alcohol wash protocol.
- Penn State Extension, Varroa Mite Management: Action threshold of 2-3% mite infestation in late summer before winter bee production is commonly used by extension programs.
- Journal of Economic Entomology, comparison of Varroa destructor sampling methods (2016): Alcohol wash detected varroa at significantly higher rates than the sugar roll when both were performed on the same colonies.
- University of Minnesota Extension, Varroa Mite Monitoring: Roughly 30-70% of varroa mites are inside capped brood cells at any given time; nurse bees in the brood nest carry more phoretic mites than foragers.
- VETO-PHARMA, Varroa EasyCheck product page: The VETO-PHARMA Varroa EasyCheck is a commercial two-chamber mite-counting device available for approximately $15-20.
- U.S. EPA, Pesticide registrations for varroa mite treatments including oxalic acid and amitraz: Oxalic acid, amitraz-based strips, and thymol-based products are EPA-registered varroa treatments with specific labeled application instructions.
- University of Florida IFAS Extension, Varroa Mite Infestation of Honey Bees: The alcohol wash method is described as a standard monitoring technique for hobbyist and commercial beekeepers in university extension guidance.
- North Carolina State University Apiculture, Monitoring for Varroa Mites: Monthly monitoring during the active season and a critical late summer check are recommended components of seasonal varroa management.
Last updated 2026-07-09